It shall be mixed as soon as it is used.
(see the figure) after standing for 5min, conduct secondary mixing, and use after mixing evenly.
Roll coating glue (recommended) in order to ensure better adhesion between putty and base course, it is recommended to roll coating diluted glue on base course.
The mixed gypsum mortar shall be used up within 2H.
901 glue is used, and the weight ratio of glue and water is about 1:16.
Statement: issued by putty mortar branch.
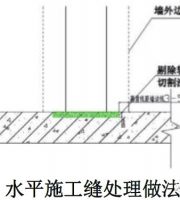
During inspection, pay attention to the plugging of wall screw holes, especially the outer wall, to prevent water seepage from the outer wall.
Wall cleaning 1) clean the impurities, floating ash, oil stain, etc.
In order to prevent cracking at the mortar joint of the filling wall, the filling wall shall be fully paved with grid cloth, rubbed and calendered, and the thickness should be controlled within 3 mm (see Figure).
See the photo of gypsum mortar layering method.
The ratio of water to gypsum mortar is about 2:3.
Internal and external corners shall be leveled with gypsum mortar.
The brick wall is fully pasted with grid cloth.
After passing the acceptance, the construction of the next process shall be carried out to ensure that the wall is clean, the vertical flatness and the deviation of bay squareness shall be controlled within 4mm.
The joints of different walls, wire duct ducts and boxes are pasted with grid cloth.
Hotline: 13207528807 Consultation hotline: 13207528807 I.
2.
The external wall shall be filled with foaming agent and mortar to prevent external wall leakage.
on the plastered wall to ensure that the wall is clean (see Figure).
After the first layer of gypsum mortar priming, scrape the first layer of gypsum mortar (Fig.
The first layer of gypsum mortar priming 11.
construction process base course treatment → check the vertical flatness of the wall and the squareness of the space → block the screw hole → wall cleaning → concealed acceptance → construction preparation → roll glue (recommended) → gypsum mortar mixing → gypsum mortar squareness leveling of internal and external corners → joints of different walls, wire ducts Paste 300mm wide grid cloth at the box → paste plastic corner strips at internal and external corners → plaster 5mm thick gypsum mortar for the first time → fill the wall with grid cloth → plaster 3mm thick gypsum mortar for the second time → whiten two layers of finished water-resistant elastic white putty → finished product protection II.
Plug screw holes 3.
Mix evenly with a portable mixer for 2min-5min to make the slurry reach the consistency required for construction.
Gypsum mortar layering method (I) gypsum mortar layering method (II) gypsum mortar layering method (III) 12.
2) Before construction, special technical disclosure shall be made to operators, and key control links in the construction process shall be guided( See Figure) technical disclosure of pre shift operation 6.
Check the vertical flatness of the wall and the squareness of the space with 2m guiding rule and infrared instrument, Check the vertical flatness of the base course, and check the squareness of the bay with an infrared rangefinder (or tape).
5.2.5) according to the Bay control line, and control the thickness within 5mm.
Construction preparation 1) after the base course treatment is completed and before plastering, the plastering materials, machines and tools shall be prepared, and the gypsum mortar shall be placed in a dry position to prevent wet caking.
Block the screw hole on the concrete shear wall, and fill the screw hole through the wall with cement mortar (gypsum mortar can also be used) (see the figure).
When the same side is the wall where the concrete shear wall or the column is connected with the infilled wall (the wall where heterogeneous materials are connected: including infilled wall and concrete shear wall, infilled wall and concrete beam, kitchen flue and wall, wire duct ducts and boxes, etc.), in order to further prevent cracking at the joints, A layer of glass fiber mesh cloth not less than 30cm wide shall be pressed into this part, and each side shall not be less than 15cm (see Figure).
Paste grid cloth on the handover wall 10.
However, there shall be no visible water drops on the wall before plastering, so as not to affect the normal bonding performance of gypsum mortar.
During the first gypsum mortar priming, a 2m guiding rule shall be used at any time for mesh inspection and timely repair, especially the internal and external corners, and the room squareness shall be rechecked at the same time.
After passing the self inspection, the team shall report to the project department for acceptance, and then report to the supervisor for acceptance.
When the same surface is a concrete wall: if the wall meets the paint free requirements (generally, the paint free requirements can be met if the vertical flatness of the wall is within 4mm), the elastic water-resistant white putty can be directly applied without painting.
Putty construction and finished product protection.
It shall not be mixed with water repeatedly, and the used slurry shall not be used with water after hardening.
After gypsum mortar plastering is completed and meets the requirements of construction specifications, whiten the surface layer with high water-resistant white putty and pay attention to the protection of finished products.
The internal and external corners are the weak parts that affect the vertical flatness of the whole wall in the structural construction stage.
Construction methods and operation points 1.
Slurry preparation 8.
Snap the control line at the internal and external corners 9.
The infilled wall and shear wall shall be uniformly roll coated( See the figure) roll glue on the wall 7.
For mixing gypsum mortar, first pour water into the mixing bucket, and then pour mortar.
According to the technical disclosure of gypsum mortar plastering, the construction team shall carry out wall treatment.
5.
Wall cleaning 2) water the plastered wall 1-2D in advance, especially the plastered wall with high water absorption such as aerated block.
After the mortar is solidified, generally 24h later, carry out the second layer of gypsum mortar covering.
First, use an infrared instrument to pop up horizontal and vertical lines about 20cm away from the internal and external corners of the wall (see Figure), and then use gypsum mortar for leveling.
If there is deviation or concave convex of the wall, repair and level the part first( See the figure) check the vertical flatness of the base wall, check the room Bay and net depth.
Hanging net and the second layer of gypsum mortar covering shall be plastered with gypsum mortar on the surface layer after the final setting of gypsum mortar on the bottom layer (generally 24 hours).