2.1.3} sand: medium sand or coarse sand, and its mud content shall not be greater than 3%.
Paving marble (or granite) plates: 3.7.1.
Marble fragments have no included angle, and the thickness should be consistent.
3.4 snap line: in order to check and control the position of marble (or granite) plate, pull a cross control line in the room, snap it on the concrete cushion and lead it to the bottom of the wall, then find out the surface elevation according to the wall + 50cm elevation line, snap the horizontal elevation line on the wall, and pay attention to the consistency between the indoor and corridor surface elevation when snapping the horizontal line.
3.6 brush plain cement slurry and auxiliary mortar bonding layer: after trial paving, remove the sand and plate, clean it, spray water with a watering can, and brush a layer of plain cement slurry (the water cement ratio is 0.4 ~ 0.5, do not brush too large area, and brush with mortar).
Process flow: preparation → trial assembly → snapping line → trial arrangement → brushing cement slurry and paving mortar binding layer → paving marble plate (or granite plate) → joint pouring, joint wiping → waxing 3.2.
2.1.6 calculate machines and tools; Trolley, shovel, ruler, syrup, bucket, watering pot, iron trowel, wooden eraser, ink fountain, steel tape, nylon thread, rubber hammer or wooden hammer, iron level, bend square ruler, steel chisel, alloy steel flat chisel, bench drill, alloy steel drill, broom, grinding wheel saw, grinder and wire brush.
Materials and main machines and tools; 2.1.1 the varieties and specifications of natural marble and granite shall meet the design requirements, and the technical grade, gloss and appearance quality requirements shall meet the provisions of national standards natural marble building plate and granite building plate.
Determine the mortar thickness of the bonding layer according to the horizontal line of the plate surface, pull the cross control line, and start paving the dry hard cement mortar of the bonding layer (generally 1:2 ~ 1:3 dry hard cement mortar is used, and the degree of dryness should be kneaded by hand and scattered on the ground).
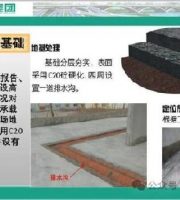
3.2.2 base course treatment: clean the sundries on the ground cushion, brush off the mortar bonded to the cushion with a steel wire brush, and clean it.
2.
2.2.5 the detailed construction drawing of laying marble floor shall be drawn before construction operation.
After unpacking, check whether the variety, specification and quantity meet the design requirements in detail.
3.7.2 according to the cross control line drawn in the room, lay one line vertically and horizontally as standard reinforcement for large-area paving.
According to the number and pattern during trial assembly and the gap during trial arrangement (the gap width between plates shall not be greater than LMM when there is no provision in the design), paving shall be started at the intersection of cross control lines..
3.
The thickness should be controlled to be 3 ~ 4mm higher than the horizontal line of the surface layer when placing the marble (or granite) plate.
Operation process 3.1.
2.2 operating conditions: 2.2.1 after entering the site, the marble and granite plates shall be stacked vertically on the side opposite to the indoor smooth surface, padded with pine strips on the back, and padded with water under the plate.
2.2.2 set up the processing shed, install the bench drill and grinding wheel saw, and connect the water and power supply.
If there are cracks, missing edges, missing corners, warpage and surface defects, they shall be removed.
2.2.3 indoor plastering (including riser), ground cushion, electric pipes embedded in the cushion and pipelines through the ground have been completed.
3.7.
2.1.2 cement: Portland cement, ordinary portland cement or slag Portland cement, and its grade should not be less than 425.
2.2.6 during winter construction, the operating temperature shall not be lower than 5 ℃.
Construction scope of marble, granite and broken marble floor 1 # this process standard is applicable to the marble, granite and broken marble floor surface of civil buildings (marble plates shall not be used for outdoor floor surface).
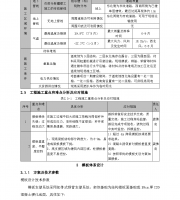
See table 7-12 for the allowable deviation and appearance requirements.
The plates shall be soaked with water and laid after being wiped dry or the surface is dried.
3.3 # trial assembly: before the formal laying, the marble (or granite) plates of each room shall be trial assembled with technical patterns, colors and textures.
Construction preparation 2.1.
3.5 trial arrangement: lay two strips of dry sand in two mutually perpendicular directions in the room, the width of which is greater than the width of the plate, and the thickness is not less than 3cm.
After the trial assembly, they shall be numbered in two directions, and then placed neatly according to the number.
2.1.4 marble fragments and colored stone slag: the color of stone slag shall meet the design requirements.
The non whole plates shall be symmetrically arranged near the wall of the door.
Arrange the marble (or granite) plate in combination with the construction detail drawing and the actual size of the room, so as to check the gap between the plates and check the relative position of the plate with the wall, column, hole and other parts.
White cement: white portland cement, with grade no less than 425.
Be familiar with the dimensions and methods of each part based on the construction detail drawing and processing order, and understand the hole The relationship between edges and corners.
Preparation: 3.2.1.
After paving, scrape it with a large bar and then pat it with a trowel for leveling (the paving area shall not be too large).
2.1.5 mineral pigment (for wiping joints), wax and oxalic acid.
The particle size should be 14mm, hard and free of sundries.
2.2.4 snap a + 50cm horizontal line on the walls around the room.