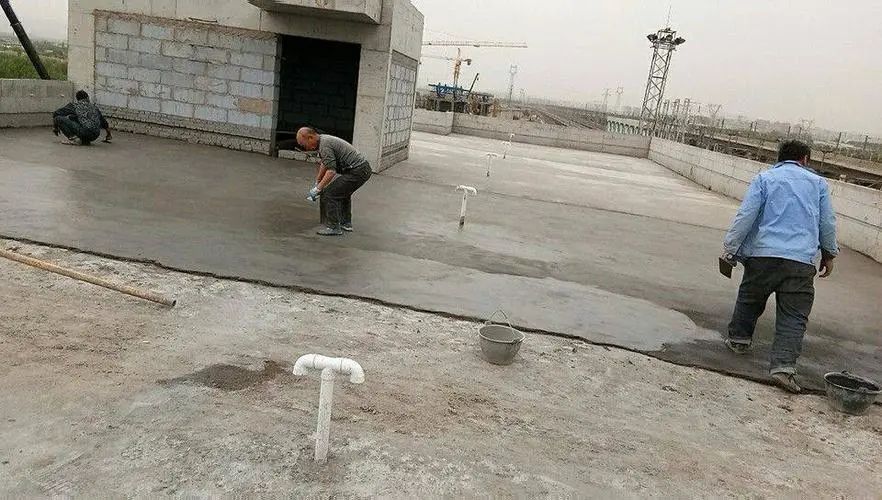
8) Press the cement mortar for the second and third times with an iron trowel: When the cement mortar starts to set and people step on it with footprints but do not sink, press the cement mortar for the second time with an iron trowel.
(3) Asphalt mortar leveling layer: 1) Base course cleaning: refer to the requirements of cement mortar leveling layer.
should be done before large-scale plastering.
When the trowel cannot press out the trowel lines, it can be leveled and compacted to complete the third plastering process.
Generally, the width of the dividing joint shall be 20mm; The location of the reserved dividing joint should be at the joint of the prefabricated support, and the maximum spacing of its longitudinal joints should be: the cement mortar leveling layer should not be greater than 6m, and the asphalt mortar should not be greater than 4m.
3.
(2) Asphalt mortar: It is best to use mineral powder with the same properties as sand, and can also be used as slag, shale powder, talc powder, etc., but it is not allowed to use lime and clay powder, etc; The requirements for mud content and organic impurities are the same as those for sand.
4.
Construction Standards for Leveling Layer Table 3-2 (2) Plastering Cement Mortar Leveling Layer: 1) Base Course Cleaning: Clean up loose debris on the structural layer, insulation layer, or insulation layer, and remove hard blocks protruding from the surface of the base course.
7) Plastering and pressing for the first time: Ditch edges, corners, roots, etc.
4) For roofs without thermal insulation layer, cement shall be evenly sprinkled on the surface of precast concrete components, and then water shall be poured.
Haina Sichuan, forge ahead.
Vertical joints and damaged corners that are not easy to fill should be filled and leveled with debris from similar insulation panels.
Material Requirements (1) The quality and technical performance of the materials used must comply with the design requirements and construction specifications.
Contents of disclosure: Roof leveling layer This technical disclosure is applicable to the construction of cement mortar and asphalt mortar leveling layer for the entire and prefabricated roof of industrial and civil buildings paved with coiled materials.
Operating conditions (1) Before the construction of the leveling layer, the roof insulation layer and structural layer should be inspected and accepted for concealed works, and procedures should be handled.
(3) According to the slope specified in the design, snap the line, find the rules (including the slope of the gutter and eaves gutter), and thoroughly clean them.
Plaster the screed along the drainage direction with a spacing of 1.5m.
When the dividing joint is also used as the exhaust duct of the exhaust roof, the dividing joint shall be appropriately widened and connected to the insulation layer.

Become an engineer with strength, temperature, attitude, and depth.
1) Cement: no less than 325 # ordinary Portland cement or slag Portland cement.
2) Sand: Medium sand is suitable: the silt content is not more than 3%, free of organic impurities, and the grading should be good.
The consistency of mortar should be controlled at about 7cm.
2) When using prefabricated insulation layers such as aerated panels, the bottom of the panels should be compacted and leveled first.
If you need all kinds of technical disclosure procedures, please pay attention to the “Construction military academy”! Never indulge in comfort and muddle along.
The thickness of the virtual paving mortar shall be 1.3 to 1.4 times the compacted thickness.
3) Watering for wetting: Before plastering the leveling layer, the base layer should be watered for wetting, but it should not be thoroughly watered, and it should be properly controlled to ensure that the leveling layer and the insulation layer can be firmly combined.
The cement mortar shall be evenly brushed with a broom, and a cement mortar leveling layer shall be made as the brushing proceeds.
9) Curing: After the leveling layer is leveled and compacted, it shall be watered for curing after 24 hours at normal temperature.
When continuing construction, clean the joints, brush with a layer of hot asphalt, and then pave with asphalt mortar.
2.
The curing time is generally not less than 7 days.
For large area plastering, lay mortar between the two rebars (the mix ratio should meet the design requirements), use a trowel to level it, then use a short wooden rod to level it according to the elevation of the screed on both sides, then use a wooden trowel to level it, and then use a wooden rod to check the flatness.
If the root and corners cannot be rolled, they can be flattened and compacted with a soldering iron to ensure no indentation.
7) When retaining construction joints, it is advisable to leave them obliquely rubbed.
5) After screeding the mortar, use a fire roller to roll it (when the temperature is high in summer, there may be no fire inside the roller) until it is flat, dense, without honeycombs on the surface, and no indentation is visible.
This process should be carried out before the initial setting of the mortar.
The dividing joint is generally bounded by the support point of the plate.
Pay attention to preventing pressure leakage, and smooth the dead pits, corners, and sand holes.
The main machines and tools shall generally include mortar mixer or concrete mixer, sand slurry cart, shovel, iron trowel, horizontal scraping bar, level ruler, asphalt pan, heating frying pan, thermometer, soldering iron, etc.
What can shield you from the wind and rain can also make you invisible.
Temperature Requirements for Asphalt Mortar Construction (Table 3-36) The roller drum should be kept clean at all times, and the surface can be brushed with diesel oil.
Find the flashing at the drainage ditch and rainwater inlet, and then plaster the leveling layer after screeding.
After drying, the waterproof layer can be constructed.
Continue to heat to the required temperature, but do not allow the temperature to rise too high to prevent the carbonization and deterioration of the asphalt.
The temperature requirements for asphalt mortar construction are shown in Table 3-3.
After paving, use a fire roller or a soldering iron to flatten them.
.
Only by making yourself stronger can you truly hold up a piece of sky.
2) After cleaning the dry base layer, apply 1-2 coats of cold primer oil fully, evenly, and keep the surface clean.
Parts with slope requirements must meet drainage requirements.
(2) The roots of various embedded pipe fittings that pass through the roof, as well as the roots of chimneys, parapets, warm trench walls, expansion joints, etc., shall be properly treated according to the drawing requirements.
Operation process flow: base layer cleaning → pipe root plugging, fixed snapping and slope finding → watering and wetting → bottoming and slope finding → paving asphalt mortar, plastering water slurry → curing, rolling → acceptance (1) The construction of leveling layer is shown in Table 3-2.
Preheat and dry to 120~140 ℃.
5) Plaster the screed and paste the mortar cake according to the slope requirements.
4) After the cold primer oil is dried, the asphalt mortar shall be laid according to the gradient set.
6) The leveling layer shall have a dividing joint.
(3) Asphalt: The asphalt used for asphalt mortar can be 60 # A, 60 # B road petroleum asphalt or 75 # ordinary petroleum asphalt.
1.
Then, pour the melted asphalt into a mixing tray according to the measurement, and mix it evenly with the sand and powder.
3) Preparation of asphalt mortar: First, melt and dehydrate the asphalt, and at the same time, mix the medium sand and powder evenly according to the mix ratio requirements.


