Expansive cement mortar needs to be mixed centrally, and direct mixing on the floor is prohibited.
Process flow: Remove plastic cushion blocks – Cut off screws – Brush anti rust paint – Wet with water – Seal the inner and outer sides – Waterproof additional layer – Waterproof layer and protection – Interior decoration node diagram: Construction method: (1) Remove plastic cushion blocks and remove the inner and outer plastic cushion blocks one by one.
The quality inspector tracks and checks the filling quality during the process, and promptly issues a rectification notice and reports any non-conforming filling.
Use an impact drill to remove and clean the PVC pipes inside the wall, and clean the residual mortar around the hole holes.
After pouring in a portion, use a 10 diameter steel bar to compact it, repeat filling and compacting multiple times, and finally use an iron trowel to smooth and press the bolt holes.
5.
Before sealing the bolt hole, an expanding drill bit must be used to remove at least 50mm of the PVC pipes at both ends of the hole from the outside to the inside, and an air compressor should be used to clean the floating dust inside the hole.
3.
The treatment of screw hole holes on the inner wall of the structure is the same as that on the outer wall.
(3) Moisturize by watering, clean the debris inside the hole, and moisten the surrounding area with water.
Expand the outer hole as much as possible into a 20mm deep trumpet shape.
The sealing of bolt holes should follow the principle of “construction from the inside out and in layers”, and it is prohibited to carry out one operation or surface camouflage construction.
Before formal construction, the template should be constructed first, and the mortar mix ratio should be labeled with the dosage of various materials.
If the brand or model of polyurethane foaming agent is changed midway during construction, a new trial drive should be conducted.
First, use cement mortar to preliminarily seal the inner wall, and then start sealing the outer wall holes after solidification.
6.
Let’s come to the construction site to see how the screw holes on the exterior wall are sealed.
Additionally, it is necessary to confirm the initial setting time of the foam to provide construction data for large-scale construction.
Structural Drawing 2 for Sealing Outer Wall Bolt Holes: Sealing Process Flow of Outer Wall Screw Holes: 1.
Before constructing the waterproof layer, the grooves at the screw positions should be compacted and leveled with 1:2 polymer cement mortar one by one.
First, chisel out a 15mm deep and 30mm diameter trumpet shaped screw hole, and pour 1:3 cement mortar.
2.
Before using foam for large-scale construction, polyurethane foam should be tested at the designated location to determine the amount of foam used in a single cell, in order to prevent excessive foam from causing foam overflow and affecting the filling quality of subsequent dry and hard mortar.
During the construction process, a large number of through-wall screws are used.
After the construction template is removed, the tension screw hole is sealed with waterproof mortar, and the outer side is coated with waterproof paint to ensure the standard of zero leakage on the external wall.
During operation, wait for one end of the mortar to solidify before grouting and sealing the other end.
(7) Interior decoration: After the construction of the waterproof layer on the outer side of the wall is completed, the interior decoration will be constructed.
When conical plastic pads are used at both ends of the one-time through-wall screw, after the maintenance is completed, the plastic pads need to be removed one by one inside and outside the wall, and then the screw should be cut from the deepest part of the hole.
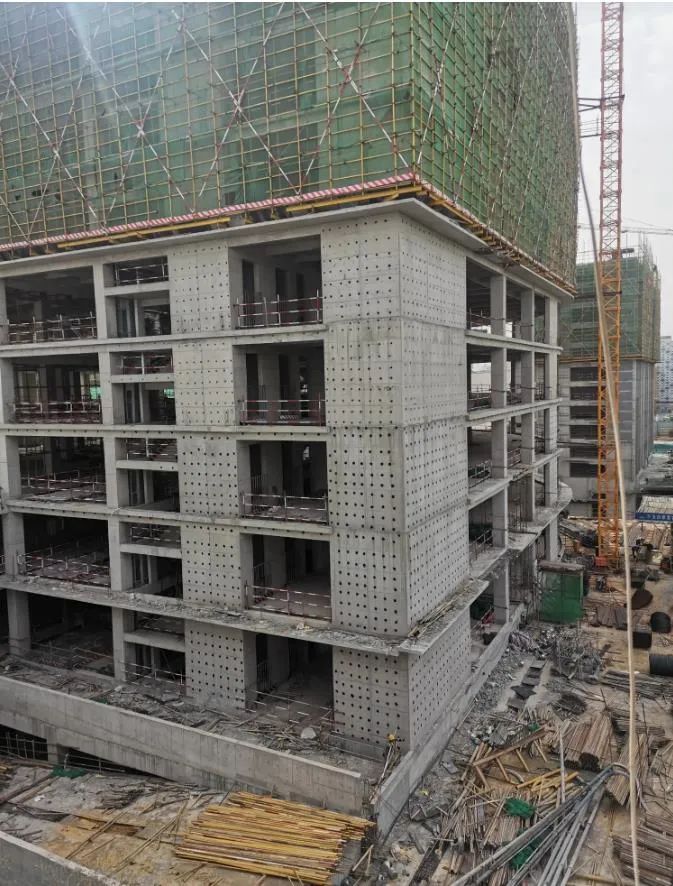
1、 How to seal the screw holes on the exterior wall? Come to the construction site to take a look at the exterior walls of shear walls and frame shear structures.
5.
Use a watering can on the exterior wall to spray water and keep the surrounding bolt holes moist.
Quality control points: (1) Disposable water stop pull screw and water stop plate; (2) Cutting depth of pull screw; (3) Brush anti rust paint on both sides; (4) Wet grooves; (5) Polymer cement mortar leveling and polishing; (6) Scope and thickness of waterproof additional layer; (7) Waterproof layer and waterproof protective layer; (5) Key precautions for construction process; (1) Loose concrete at the hole edge must be chiseled off.
3.
4.
(4) Seal the inner and outer sides, use polymer cement mortar to seal the concave grooves of the inner and outer screw holes, and compact and trowel them.
2.
Use an iron trowel to apply expanded cement mortar (with an expansion agent content of 4% to 5% of the cement content) to the bolt holes from the outside to the inside of the exterior wall.
Make a waterproof protective layer outside the waterproof layer.
(5) Waterproof additional layer, after the polymer cement mortar is dried (about 24 hours), on the side facing the water surface of the wall, at the position of the construction screw, the waterproof additional layer, with an additional layer size of 100 × 100mm。 The waterproof materials and methods are the same as those of the waterproof layer.
2.
The middle of the screw needs to be welded with a thickness of 2 and 70 × 70mm water stop strip.
Instructions for the treatment of the water stop screw node: The screw used to fix the template must use a one-time water stop pull screw.
The sealing of through-wall screw holes involves the risk of leakage on the exterior walls, and must be taken seriously during construction.
(2) Cut off excess screws and cut them from the deepest part of the groove.
Fill the bolt hole with cement mortar and use steel bars to fill it with mortar.
Before blocking, after cleaning the garbage inside the hole and wetting it with water, it is necessary to request the project quality inspector to inspect and accept it before filling with mortar.
6.
After the waterproof construction is completed, 4.
After solidification, centered around the bolt hole on the outer wall, apply cement-based waterproof coating JS with a thickness of 1.5mm and a diameter of 150mm.
4.
4.
【 Answer 】 This is the tension bolt hole left by the support template during the construction process.
6、 Construction quality requirements: 1.
(6) After the acceptance of the waterproof layer and protection, the waterproof additional layer shall be applied with a polyurethane waterproof film of no less than 2mm thickness or a roll of no less than 4mm thickness on the upstream surface for waterproofing.
The disposable water stop pull screw can use a tool type screw or a screw with a conical plastic pad to leave a groove at the end of the screw.
3、 On site construction example: Take out the PVC plastic casing and expand it into a bell mouth.
Before the construction of the exterior wall decoration layer, the bolt holes on the exterior wall should be sealed and waterproof treatment should be done.
After the initial setting of the polyurethane foaming agent (preferably non stick), use a round steel with a diameter one size smaller than the bolt hole (without burrs at the end) to extrude the polyurethane foam from the outside to the inside, and the extrusion depth reaches 50-55mm as the qualified standard.
After the polyurethane is squeezed into the hole, it should be confirmed that there is no residue on the hole walls at both ends.
The sealing of exterior wall bolt holes should be strictly carried out in accordance with the approved construction plan and technical disclosure.
3.
Then use 1:3 dry hard mortar to fill and compact, and the dry hard mortar requires the outer side to be flush with the wall, with a smooth surface.
.